
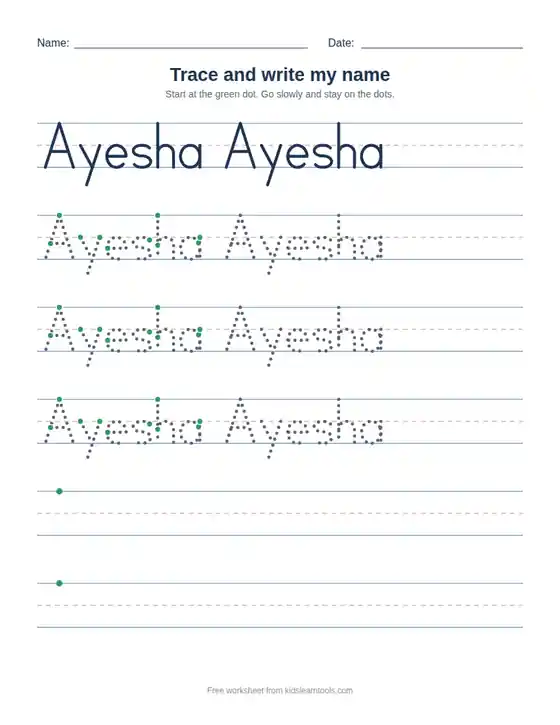
A name tracing generator turns your child’s name into a printable tracing worksheet. Type the name, choose dotted, gray or dashed letters, and print a page with handwriting lines, green starting dots and empty rows for practice. This tool is free, works on phones and computers, and the name you type is never saved.
I made this generator after 8 years of teaching kids in schools. Writing their own name is the first real handwriting goal for most kids, and a worksheet with their name on it makes them want to try. Make one sheet for your child, or paste a whole class list and print a page for every student in one go.
Make Your Free Name Tracing Worksheet
For a whole class, type one name per line. Each name gets its own page (up to 40 names).
Your child writes the name alone on these rows.
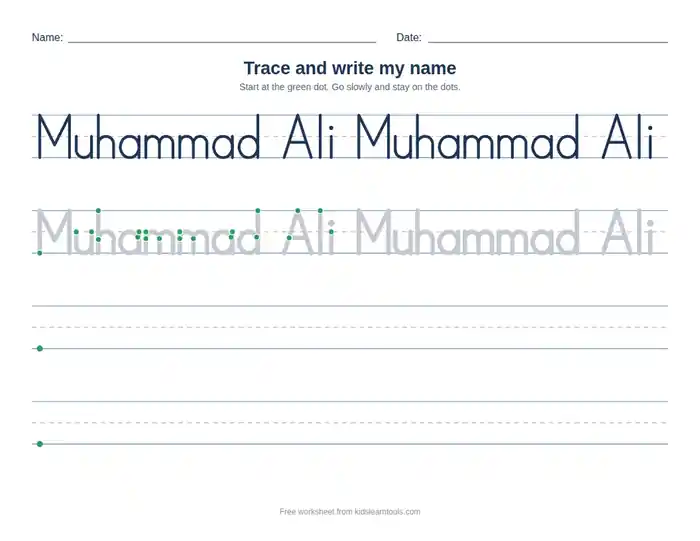
Landscape gives long names more room.
The name stays in your browser. Nothing is sent or saved.
Preview updates as you type. To save a PDF, click Print and choose “Save as PDF”.
How to Make a Name Tracing Worksheet
You can make an editable name tracing worksheet in under a minute. Follow these four steps:
- Type the name. Enter your child's first name, or first and last name. For a class, type one name on each line. Each name gets its own page.
- Pick the letters. "First letter capital" is best for most kids (Ayesha, not AYESHA). Then choose dotted, gray or dashed tracing.
- Set the layout. Choose the letter size, how many empty rows you want at the end, US Letter or A4 paper, and portrait or landscape.
- Print or save. Click "Print or save as PDF". To keep a PDF, choose "Save as PDF" in the print window. You can also download one page as an image.
What Each Option Does
Every setting in this name tracing generator has a teaching purpose. Use this table to choose the right options for your child.
| Option | Choices | Best for |
|---|---|---|
| Tracing style | Dotted, Gray, Dashed | Gray for first-time tracers (easy to see). Dotted for most kids. Dashed for kids who trace well and need less help. |
| Letter size | Small, Medium, Large | Large for ages 3–4, Medium for ages 4–5, Small for kindergarten and up. |
| Dark example row | On / Off | Shows the finished name first, so your child knows the goal before tracing. |
| Green starting dots | On / Off | Shows where each stroke begins. This stops the habit of starting letters at the bottom. |
| Empty rows | 0 to 3 rows | Lets your child write the name alone after tracing. |
| Name in each row | Once, or repeat to fill | "Once" for short attention spans. "Repeat" for more practice on one page. |
| Page | Letter / A4, Portrait / Landscape | Landscape gives long names, like "Muhammad Ali", more room. |
Why Kids Learn to Write Their Name First
A child's name is the most meaningful word they know. That is why teachers start handwriting with name practice instead of random letters. Tracing their own name helps kids:
- Recognize their name on cubbies, books and classroom charts.
- Learn letter shapes in a real word, not in a list.
- Build fine motor control and a steady pencil grip.
- Understand print: that letters go left to right and sit on a line.
- Feel proud. "I can write my name!" is a big confidence boost before school.
What Age Can Kids Trace and Write Their Name?
Most kids start tracing their name around age 3 to 4 and write it without help by the end of kindergarten (about age 5 to 6). Every child is different, so use this table as a guide, not a test.
| Age | What many kids can do | Worksheet settings to try |
|---|---|---|
| 2–3 years | Scribble and know the first letter of their name | Skip worksheets. Trace letters in sand or play dough first. |
| 3–4 years | Recognize their whole name and trace big letters | Large size, Gray style, name once per row, no empty rows |
| 4–5 years | Trace the full name and copy some letters | Medium size, Dotted style, starting dots on, 1 empty row |
| 5–6 years | Write their first name from memory | Small size, Dashed style, 2–3 empty rows, add the last name |
Capital Letters or Small Letters: Which Should Kids Trace?
Teach the name the way it is written in books: a capital first letter, then small letters (Ayesha). Many kids learn all-capital names from toys and signs, but school writing uses mostly lowercase letters. Learning "AYESHA" first means relearning it later.
All capitals can help for a short time if your child is 3 and still building hand control, because capital letters are mostly straight lines. Switch to "First letter capital" as soon as your child can trace curves.
From Tracing to Writing Alone: 3 Simple Stages
Tracing is a starting point, not the goal. Move your child through these stages over a few weeks:
Stage 1: Trace with full help
Use Gray or Dotted letters, Large size and green starting dots. Sit with your child and say the letter names as they trace.
Stage 2: Trace, then copy
Switch to Dashed letters and turn on the dark example row. After tracing, your child copies the name by looking at the example.
Stage 3: Write alone
Add 2 or 3 empty rows. Your child traces once, then writes the name on the empty lines without help. When the empty rows look good, your child is ready to write the name on drawings and cards.
From My Classroom: A Teaching Methodology Built on Confidence, Patience, and Practice
For eight years, I taught in schools and colleges, with a special focus on supporting slow learners and students who needed additional academic guidance. My teaching philosophy was simple: every child has the potential to learn, but not every child learns at the same pace or in the same way.
Students who grasp concepts quickly often progress independently, while others need more time, encouragement, repetition, and individual attention. I learned that before a child can make academic progress, they often need to develop self-confidence, a sense of belonging, and a positive attitude toward learning.
I always encouraged my students by reminding them that learning difficulties do not define their abilities. Every child has strengths, and with the right teaching strategies, consistent practice, and a supportive learning environment, they can make meaningful progress.
Three Learning Groups, One Inclusive Classroom
To address different learning needs, I organized my classroom into three groups: Super, Duper, and Average. This approach helped me differentiate instruction according to students' learning levels while maintaining a collaborative classroom environment.
Students in the Super group were encouraged to strengthen their skills, take on challenging tasks, and maintain consistent academic performance. The Duper group was motivated to improve their performance and work toward higher learning goals. Meanwhile, students in the Average group received additional guidance, motivational support, and hands-on learning activities to help them understand concepts more effectively.
I also used peer-assisted learning and collaborative learning strategies, pairing students so they could learn from one another. Children often feel more comfortable asking questions and exploring new concepts with their peers. Through guided interaction, they can develop academic skills, communication abilities, and confidence.
This differentiated approach helped me address individual learning needs without making students feel excluded. Gradually, I observed noticeable improvements in students who had previously struggled with their studies. Their progress was especially rewarding when parents shared their appreciation for the positive changes they saw in their children.
Three Handwriting Lines and Green Starting Dots
One of the most effective techniques I used was a simple, structured approach to teaching children how to write their names.
I drew three handwriting lines on the page and marked starting dots to show children where to begin forming each letter. These visual cues helped them understand letter placement, direction, and formation. I then guided them through the spelling of their names, introducing one letter at a time.
Initially, I provided direct support and demonstrated the correct writing movements. As the child became more comfortable, I gradually reduced my assistance and encouraged independent tracing and writing.
This method reflects the principles of explicit instruction, visual scaffolding, and gradual release of responsibility. Children first observe a demonstration, then practise with guidance, and eventually attempt the task independently.
Over time, a child who once needed continuous support was able to write their name without assistance. Experiences like this showed me how small, purposeful teaching techniques can make a meaningful difference in early literacy development.
This is also the educational principle behind the handwriting worksheets available through this tool. The handwriting lines provide visual structure, while the green starting dots help children identify where each letter begins. Together, these features support letter formation, fine motor coordination, and the development of early handwriting skills.
Breaking Difficult Words into Smaller Parts
When students struggled with long or unfamiliar words, I used phonics-based instruction, syllable segmentation, and repetition to make learning more manageable.
For example, I would write the word appreciate on the board and divide it into smaller parts: ap-pre-ci-ate. I would pronounce each part clearly, encourage the children to repeat it, and then guide them in combining the parts to read the complete word.
After practising the pronunciation, I asked students to recall the word and attempt to spell it independently. Breaking a complex word into smaller, more manageable units reduced the difficulty of the task and helped students focus on one step at a time.
This approach is based on the educational principle of chunking, in which information is divided into smaller units to make it easier to process, practise, and remember. When combined with phonics instruction, guided practice, and retrieval practice, it can support the development of reading and spelling skills.
The same principle can be applied when teaching children to write long or unfamiliar names. Instead of asking a child to write the entire name immediately, begin by pronouncing it in manageable parts. For example, Muhammad can be practised through syllable awareness before the child traces and writes the complete name.
By moving from smaller units to the complete word, children can develop greater familiarity with spelling patterns and build confidence in their abilities.
Learning at Home: Helping My Son Write His Name
I have also applied these teaching principles at home. Recently, my son was still learning to write his name, so I introduced a simple activity using a small whiteboard and a marker.
Rather than asking him to write the complete name immediately, I broke the task into smaller steps. I pronounced each letter, helped him recognize the letters in the correct order, and encouraged him to write them one at a time. Once he became familiar with the individual letters, I asked him to join them together to form his name.
I explained that each letter was part of a complete word and that putting the letters together would create something meaningful: his own name.
Parents can use the same approach at home with a name-writing worksheet. Start by saying each letter aloud, demonstrate how to form it, and allow your child to practise. Next, encourage tracing with visual guidance before inviting the child to write the entire name independently.
Keep the activity short, positive, and enjoyable. Offer encouragement for effort and improvement rather than focusing only on perfect handwriting. If a child finds a step difficult, return to guided practice and gradually reduce support as their confidence grows.
This process reflects scaffolding, multisensory learning, and gradual skill development. It also demonstrates how structured worksheets can connect classroom teaching methods with meaningful practice at home.
My Teaching Philosophy
My eight years of teaching experience reinforced one important lesson: children need more than instructions to succeed. They need patience, encouragement, appropriate learning materials, and opportunities to practise at their own pace.
Whether a child is learning to recognize letters, write a name, read a difficult word, or develop early literacy skills, the goal is to make learning accessible and achievable.
That is the philosophy behind these learning tools: to turn challenging tasks into smaller, manageable activities that encourage independence, strengthen foundational skills, and help children approach learning with greater confidence.
Every child develops differently. With the right support, consistent practice, and a positive learning environment, even small steps forward can become meaningful achievements.
Tips for Left-Handed Kids
- Tilt the paper to the right (clockwise) so your child can see the letters while writing.
- Hold the pencil a little higher, about 2–3 cm from the tip, so the hand does not cover the line.
- Try landscape pages. The extra width gives the arm more room to move.
- Sit on the left side of a right-handed sibling or friend so elbows don't bump.
Common Name Writing Mistakes and How to Fix Them
| Mistake | Why it happens | How to fix it |
|---|---|---|
| Starting letters at the bottom | Kids copy the shape, not the movement | Keep green starting dots on and say "start at the top" each time |
| Backwards letters (S, J, N) | Normal before about age 7 | Trace only that letter for a few days, then trace the full name again |
| Letters too big or off the line | Kids don't notice the guide lines yet | Point to the top, middle and bottom lines and name them before tracing |
| Writing the name in all capitals | Learned from toys and signs | Use "First letter capital" and praise the small letters |
| Fist grip or very tight grip | Hand muscles are still weak | Use short crayons and play with play dough, pegs and tweezers |
| Rushing over the dots | Kids want to finish fast | Print fewer rows and praise slow, careful tracing |
More Free Handwriting Tools and Guides
- Letter tracing worksheet maker: practice single letters, words or names
- How to teach a child to write letters: a step-by-step guide for parents
- Letter recognition activities: 25 fun games to learn the alphabet
- Free math worksheet generator: counting and number practice sheets
Frequently Asked Questions
Is this name tracing generator free?
Yes. The name tracing generator is 100% free. There is no sign-up, no email and no limit on how many worksheets you make or print.
Can I make name tracing worksheets for my whole class?
Yes. Type one name on each line (up to 40 names). Each name gets its own page, and "Print or save as PDF" prints all pages together.
Is the name I type saved anywhere?
No. The worksheet is made inside your browser. The name is not sent to our website or saved, so it is safe to type your child's real name.
Should my child use dotted or gray letters?
Start with gray letters if your child is new to tracing, because solid gray lines are easier to follow. Move to dotted letters once your child can stay on the line, and dashed letters when they need less help.
How many times should my child trace their name?
Two or three careful tracings a day is enough. Short, daily practice builds better habits than filling a whole page while tired. Stop while your child is still enjoying it.
Can I print the worksheet on A4 paper or save it as a PDF?
Yes. Choose US Letter or A4 before printing. To save a PDF, click "Print or save as PDF" and pick "Save as PDF" as the printer.